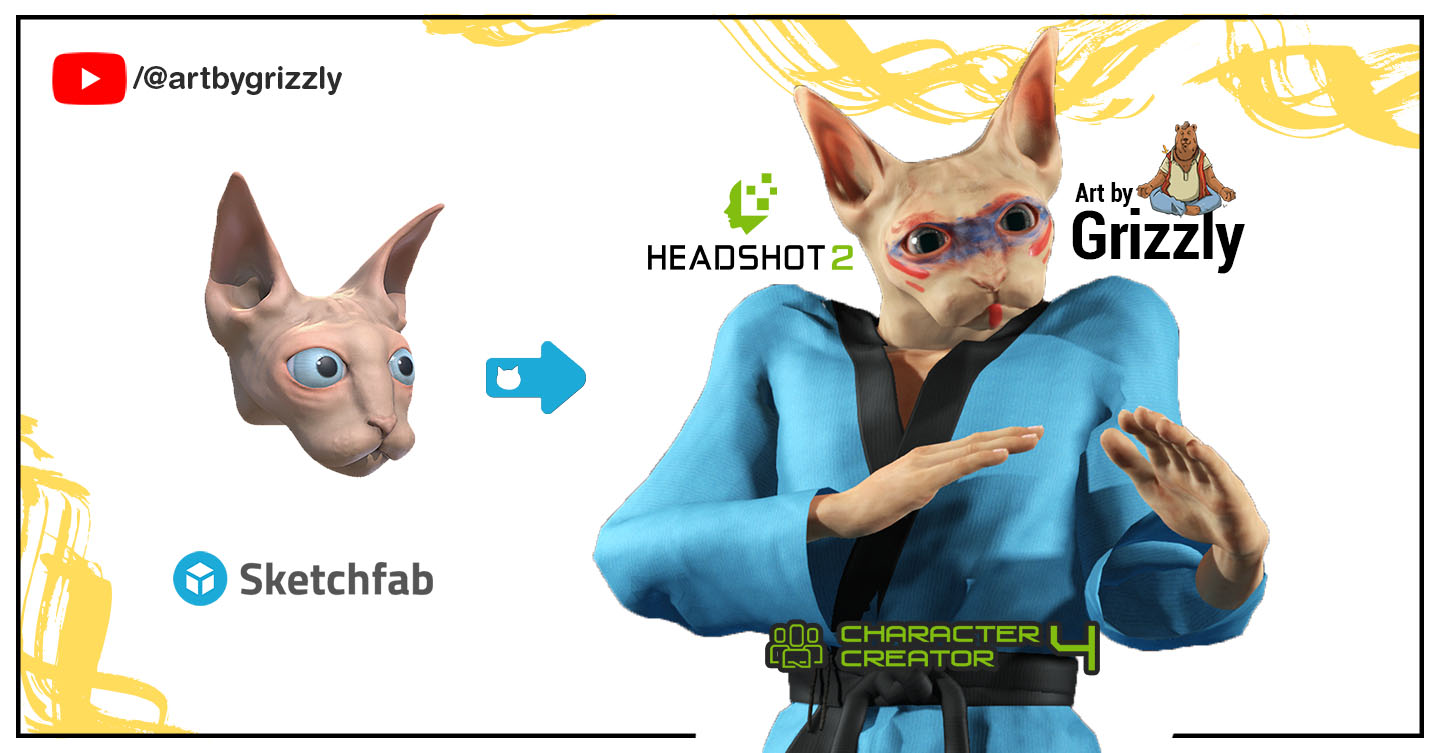
Create a Humanoid Cat using Reallusion’s Headshot 2.0 Plugin
0 comments

Reallusion, the renowned software company, has recently unveiled the highly anticipated Headshot 2.0 plugin for Character Creator. This latest version comes with an exciting new feature that allows users to create the head using mesh, expanding the possibilities for character creation. While Reallusion has provided a tutorial on their official YouTube channel demonstrating the creation of a human character using a 3D scan, today we will push the limits of this plugin by showcasing the creation of a humanoid animal character. In this article, we will walk you through the steps and present the final results of this tutorial.
Transcript: To begin, we need to find a suitable 3D model of a cat for this tutorial. Since we only require the head of the cat, a model from Sketchfab will suffice. After browsing through various options, we have selected a sphynx cat mesh provided by glcadke on Sketchfab. With the necessary files ready, let’s open Character Creator and locate the Headshot 2 plugin.
Upon opening the plugin, you will notice two options: “Create from Image” and “Create from Mesh.” For this tutorial, we will choose the latter. Before we start generating the head, we need to import the 3D model into the scene. Simply drag and drop the 3D object into the workspace and adjust its size accordingly. To ensure a clear view, switch to the front view.
Next, we will add the available textures to the 3D model. As the object consists of multiple groups, we need the one that contains all the face information. Select the appropriate group and click on “Start Head Generation.”
A new window titled “Mesh to Head” will appear. Since this is a complex non-human model, it is advisable to increase the number of alignment points. For this tutorial, we will set it to 35. These points serve as references for aligning the model’s features with those of a human face. On the left side, you will see 35 visible alignment points on a human face. Our goal is to indicate the corresponding points on the model’s face. Take your best guess and place these alignment points accordingly.
In this case, the cat model does not have distinct lips, so we will approximate their position for now and adjust it later. Place the alignment point for the chin in the appropriate location. For the ears, we will roughly determine the starting and top points. Although it may be challenging to accurately position certain points, we will place them as best we can. It’s important to note that these placements may cause some deformation on the head, but we can address that in the subsequent steps.
Once all the 35 alignment points are in place, save your progress and proceed to the next step: “Head Gen AI.” The software will generate a mesh based on the aligned points. At this stage, you may notice some deformations on the head and intrusions near the nose. To address these issues, return to the alignment points in Step 1 and add additional points. This will allow you to fix the deformations and intrusions more effectively.
For instance, to correct the nostrils, set the endpoint on the left side and assign the same position to the corresponding character on the right side. Repeat this process for the ears and other areas where additional details are necessary. Once you’ve added the required points, proceed to “Head Gen AI” again. You will notice that the intrusions near the nose have been resolved, although there may still be some deformations on the head.
Now, onto the third step: “Refine Mesh.” In this step, you will see two overlapping meshes—the one generated by Headshot and the one downloaded from Sketchfab, which serves as a reference. To refine the mesh, keep the Headshot-generated mesh active and disable the other mesh. Using the smooth tool, adjust the brush size by clicking and dragging the right mouse button, and then smooth out the faces to reduce deformations.
With the refinement complete, it’s time to attach the newly created head to a human body. For this tutorial, we will select a male body type and keep the remaining settings at default. This will utilize the textures from the source mesh and generate the necessary textures for the Character Creator (CC) character.
And there you have it—the character is complete! However, there are a few additional steps we can take to enhance the final result. In this tutorial’s Part 2, we will cover these steps. For now, we will remove the teeth to prepare for the subsequent phase.
Thank you for following along with this tutorial. Stay tuned for Part 2, where we will explore further techniques to refine and improve our humanoid animal character.
Subscribe to ArtByGrizzly YouTube Channel: https://www.youtube.com/@artbygrizzly
Transcript:
Welcome to this video tutorial where we’ll be creating a humanoid cat using the Headshot plugin for Character Creator. Let’s get started!
The first thing we’ll notice is that the head and neck size is too short. To fix this, we’ll head over to the Modify panel and make the necessary adjustments. In the next section, we’ll increase the neck height slider to achieve the desired look.
Great! Now we’ll also increase the scale of the head to make it more proportionate.
Next, we can see some deformations at the neck and back of the head. Ideally, we should have addressed this during the earlier part of the tutorial where we select the affected area. Nevertheless, we can fix it here using the Edit Mesh option in the Modify panel. Let’s select the Sculpt tool and choose the Smooth tool within it.
To reduce the deformations, we’ll increase the brush size and gently relax the affected faces.
Now, let’s go back to the sliders and increase the width and depth of the neck to further refine the character’s appearance.
Moving on, let’s check the facial expressions. There seem to be some issues with the mouth. This is because we tried to align the points of a human mouth on an animal.
To rectify this, we’ll return to the Edit Mesh option and relax the faces of the lips.
Perfect! Now, let’s navigate to the lip slider and reduce the scale of the lips to achieve a better look.
Additionally, we’ll adjust the lip seam sliders to reduce the depth of the lip seams.
If needed, we can hide the lips using the sliders in the lip seam section. By adjusting the “lip upper inner close open” and “left lower inner close open” sliders, we can manipulate the inner part of the lips and hide the lower part of the lips.
Now that the lips look better, let’s switch back to the neutral expression. There appears to be an issue just below the mouth, which is the tongue. Since it’s not a human character, the tongue placement isn’t correct. Let’s move the tongue faces inside using the Edit Mesh option.
Next, let’s select an expression where the tongue is clearly visible and make further adjustments to ensure the tongue fits properly.
Similarly, for expressions where the mouth is exaggerated, we’ll fix any issues in the mouth by using the Edit Mesh option.
By repeating this process, you can try out different expressions for your project and refine them as much as possible.
Now, let’s focus on matching the body with the head. We’ll go to the Full Body sliders and increase the body pin slider to achieve a better match.
Moving on to the eyes, we’ll increase the scale of the iris and pupil. This can be done by adjusting the Headshot slider in the Actor Parts section.
To check if the eyes are aligned properly, we’ll switch to the closed eyes expression. If the eyes appear to be extruding out, we’ll fix that by going to the Eye section in the Headshot sliders. We’ll increase the height of the eyes, reduce the width to bring them closer to the nose, and decrease the depth to make them appear more natural.
After making these adjustments, we’ll switch back to facial expressions and check if the eyes are aligned correctly.
Great! Now let’s add some clothing to our character. For this tutorial, I’ve purchased a kimono pack from the Reallusion Marketplace. I’ll leave the link in the description for you to explore.
To add an extra touch, we’ll use the SkinGen plugin to give our character some tattoos on the face. The Tribe Warrior option looks really cool, so let’s apply that to our character.
To ensure a seamless look, we’ll permanently flatten all the makeup onto the character’s texture.
Wonderful! Now let’s add a talking animation to check the facial expressions we’ve created.
Looking good! That’s how you can create a humanoid cat using the Headshot plugin for Character Creator. Since this is my first time creating these tutorials, please leave some feedback in the comment section. I’ll review it and strive to make future tutorials even better. Thank you for watching!
Subscribe to ArtByGrizzly YouTube Channel: https://www.youtube.com/@artbygrizzly
Transcript:
Good day, everyone, and welcome back to another installment of our tutorial series. This is Part 3 of our journey, where we’re using Headshot 2 in Character Creator to create a humanoid cat. In this tutorial, we will explore the process of adding additional bones to the character’s ears and converting them into spring bones to achieve secondary motion. This idea was suggested by one of our viewers on the channel, and we extend our gratitude to Doron for this fantastic suggestion. Before we proceed with the main objective, I’d like to address an issue with the character’s bone alignment for the head. As you can see here, when I edit the pose of the head, it stretches due to the incorrect bone alignment outside the mesh of the head. Let’s fix this first.
To do so, we’ll navigate to the Modify panel and click on “Adjust Bones.” Simply select the character and then click on “Auto Position.” You’ll notice that the bone is now properly aligned with the head mesh. Now, when we edit the pose and rotate the head, it works perfectly.
Now, before exporting to Blender, ensure that you’re satisfied with the final character design, as we won’t be able to change the character’s clothing later. Let’s proceed with the export to Blender. Go to “File,” then “Export FBX,” and choose “Clothed Character.” In the FBX options, select “Blender,” and for “FBX Options,” choose “Only Mesh” and set the default pose to T-pose. You can leave everything else at default settings. Now, export this model.
We also need to save the facial profile of this character. To do so, go to “Facial Profile Editor,” click on “Edit Expressions,” and then use the “Save” button to save the facial profile. Now, let’s open Blender and import the CC model that we exported earlier.
In Blender, go to the side view, enable “Viewport Display,” and select “In Front” to view the bone structure. Search for “head” in the Scene Collection, and you’ll find the CC base head. Select it and press “E” to extrude the bone, move it to the appropriate location for the ear bone, and press “E” again to extrude further to set the final bone position. Repeat this process for the other ear as well.
Now, go to the front view and adjust these two bones to match the ear’s position. Select the CC base head and repeat the same process for the other ear.
Back in Blender, select all bones with “A” and export this model as “Blender Export.”
Returning to Character Creator, drag and drop the Blender export file into the application. Select “Character” and choose “Humanoid.” Click on “Apply.” Character Creator assumes the model has an “actor build profile,” but for the spring bones to work, we need to perform the characterization ourselves. Cancel this option and go to the orthographic view and front view. Open the “Bone Manager” to see the selected bone from the scene.
Double-click on a bone in the preview to select it in the viewport. For a quicker process, enable the “Mirror” option to automatically assign bones on the other side. Confirm that the small bone is the head bone by selecting and rotating it for the headphone.
Add additional bones for the neck and hands using a similar process. The “Mirror” option can help speed up bone assignment for fingers as well.
With the characterization completed, activate Human IK, exit the characterization option, and save the project. To verify the characterization’s accuracy, apply a motion to the character.
Perfect! The characterization is successful. We can apply textures manually, but we’ll do it in iClone later. As you can see, there are no expressions on the character yet because we haven’t applied the facial profile. Let’s rectify that by going to the “Facial Profile Editor,” clicking on “Edit Expressions,” and loading the saved facial profile. Now, in the “Edit Facial” option, we can change the expressions, and everything works flawlessly.
Now, let’s go to the “Bone Manager” and search for “head.” Below the CC base head, we find the bones created in Blender for the ears. Select all of these bones and click on “Used.” Next, go to “Skin Weights” on the Modify panel and select the mesh. We’ll apply slight movement to the ears to make it more organic. So, I’ll apply the skin weights on the end bones of both ears.
Using the strength of the brush, we adjust the skin weights to control the movement areas. The color indicates the affected areas, with white (strength 1) being the most affected and black (strength 0) being unaffected. The smooth brush helps to create a smoother effect.
Repeat this process for the other ear. Now, exit the “Skin Weights” option and click on “Edit Springs.” Select the bones that require spring action, group them together, and rename the group to “ears spring.” Adjust the spring settings as needed.
Let’s check the spring motion with some animation.
Fantastic! The spring bones are working beautifully.
With that process completed, let’s add textures. Export the character to iClone 8. Use the eyedropper tool to select shaders from one character and apply them to the other. Apply eye textures by copying from one character to the other.
And now, let’s test the spring bones with a walk animation.
There you have it! That’s how you add spring bones to a humanoid character in Character Creator. Thank you for watching!
Subscribe to ArtByGrizzly YouTube Channel: https://www.youtube.com/@artbygrizzly
Transcript:
Welcome back to Part 4 of our tutorial series where we’re creating a humanoid cat character. Today, we’ll learn how to add a tail to our character. We’ll cover applying skin weights easily and adjusting the spring bones for a smooth tail movement. This idea came from two viewers, and we thank them for the suggestion. Now, let’s dive in!
We’ll start by opening the character we created in the previous tutorial. Let’s reset the expressions to zero and put the character in a T-pose for calibration. We’ll use a couple of plugins, CC Blender Tools and CC4 Blender Pipeline Tool, to simplify the process in Blender and Character Creator. You can find the download links in the description.
Now, we’ll add the tail as an attachment to the character. We’ve downloaded a simple tail model from Sketchfab and resized it to fit the character. We’ll attach it to the hip joint for now. After exporting from Character Creator using the Blender Pipeline plugin, we’ll open Blender and install the CC4 Blender plugin.
In Blender, we’ll import the character, create the tail bone structure, and export it back to Character Creator. When we import the character into Character Creator, the characterization and expressions are automatically applied. We’ll load the facial profile and check if the expressions are working.
Next, we’ll add the tail mesh to the Bone Manager, rename it, and move on to setting the skin weights for each bone. We found a simple method: select the center vertices of each bone area and grow the selection to roughly cover the region controlled by the bone. Replace the selection with “one” to indicate the entire area affected by the bone. We’ll repeat this for all the tail bones.
After that, we’ll use the smooth brush to ensure smooth skin weights and enable fluid tail movements when spring joints are activated.
Now comes the spring bone setup. We’ll make all the bones active and adjust hardness points. Each child bone should have a hardness value one point less than its parent. We’ll set mass, strength, and bounciness for the main group.
Once done, we’ll give motion to the character and check the spring bones. We may need to turn the springs on again if they get turned off. Some adjustments might be needed to achieve the desired tail movement.
We’ll also fix any deformations caused by improper smoothing during the spring bone setup. This is where we’ll go back to skin weights and smooth the affected areas to ensure a clean tail movement.
That’s it! Now you know how to add a tail to a humanoid cat character using spring bones. Thanks for watching, and these are the final results
Subscribe to ArtByGrizzly YouTube Channel: https://www.youtube.com/@artbygrizzly
Based in India. Khalikh is a Previs and Cinematic Designer with over 6 years of experience in the Indian Film Industry. His passion for films and animation led him to the city of dreams, Mumbai, and he found the world of filmmaking.
He loves to share knowledge and he believes what J.M. Cornwell has rightly said
"“Knowledge is wasted when it isn't shared.”